


Using Powerbase — Part 5
by Derek Haslam
This month we will look at mail merging and at Powerbase's script language
The latest version of Powerbase, PB913SH, has a host of improvements and additions over versions previously offered on RW discs and you are advised to upgrade using the copy on this disc. Also present is the documentation, brought up to date and presented in HTML format for easy reading along with this article, as well as Impression, Ovation Pro and PDF formats.
Mail merging
It's called "mail merging" because merging names and addresses from a database into letters is the commonest use of the principle. "Data merging" is more accurate since any textual data can be merged into any sort of document. All wordprocessors and DTP programs should support data merging by one of two methods:
- Accepting the data from a CSV (comma-separated values) file. Each line of the file consists of data from one database record, commas being used to separate the data from each field, hence the name.
- Passing the data directly from the database to the document processor by in-memory transfer. This method uses a module called Impulse II which was written by Computer Concepts about the same time as the original Impression program. In order to work, both database and document processor must be "Impulse-aware". Unfortunately few applications are. The Impression family can use Impulse merging and so can Ovation Pro (but not Ovation). Powerbase and DataPower II are also Impulse-aware.
- Ovation
- Easiwriter
- Ovation Pro
- Impression Publisher
- Impression Junior (Junior can't load the Publisher file)
Mail merging using the CSV-file method will be demonstrated using Ovation and Easiwriter and the Impulse method with Ovation Pro and the Impression family.
Mail merging with Ovation (non-Pro)
Use the links shown above to obtain !Mail and to extract the file OVATIONLET from the FORMLETTER zip file. Once you have the database and the letter there are three stages to go through:
- Create the CSV datafile using Powerbase
- Prepare the letter so that the data can be merged into the correct places
- Merge the data and (optionally) print one letter for each record in the datafile
- Open !Mail and select all the fields as though for printing. To ensure that the fields are selected in the correct order place the caret in the surname field then double-click with ADJUST over the final address field. All the fields will then become selected.
- From the main menu choose Export CSV file=>Export, change the offered filename if you wish, and drag the CSV file icon to a suitable directory. (You might care to examine this file in an editor.)
- Run !Ovation and load OVATIONLET.
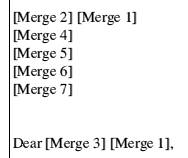
- We want the name and address of the addressee on the left, just above the salutation, so move the caret down 10 lines from the top of the page.
- Type Ctrl I. A small window headed Merge tag opens. Enter 2 and click on OK. You will see
[Merge 2] appear in the letter at the point where you placed the caret. It means that the second field of the CSV record, i.e. First name, will be inserted here. - Type a space, then Ctrl I again. This time enter 1 (for Surname) and click OK.
- Move the caret to the line underneath and insert merge tag 4, then tags 5, 6 and 7, each on its own line. These correspond to the four parts of the address.
- Place the caret in the salutation, immediately before the comma, and insert tag 3 (the Title), followed by a space and then tag 1 again. Now save the letter, the relvant part of which should look like Fig.1:
Should you experience any difficulty in reproducing the above you will find a copy of the letter, with the merge tags already inserted, in LETTER2.
Load !Printers. If just want to see the data merging into the letter but aren't prepared to waste 10 sheets of paper, set up the Connections window to print to a file.
- From Ovation's main menu choose File=>Print.
- Select the Mail merge button and drop your previously-prepared CSV file on the writable icon.
- Select Pause between pages and click OK
Mail merging with EasiWriter
I hope the following description is still relevant. I don't have a recent version of EasiWriter to hand and so carried out the trial with TechWriter v.2.01 (17-Dec-93!). It would be a good idea to read the foregoing description even if you don't have Ovation since a similar 3-stage process will be used with EasiWriter.
From Powerbase's main menu choose Export CSV file=>Options, select With header on the options window and click the Accept (OK) button. Now select all the fields and export the CSV file exactly as described above for the Ovation merge. The only difference is that the file now has a header record consisting of the tags of all the fields. (Examine the file in an editor.) It isn't essential to include this header but it makes preparing the document much more understandable.
- Extract EASILET from the FORMLETTER zip file and load it into EasiWriter.
- From EasiWriter's main menu choose Misc=>Merge=>File. This opens the Merge file window.
- Drop your CSV file onto the window and click OK. If you now look at the Misc=>Merge submenu you will find that the Powerbase field tags have been added to it.
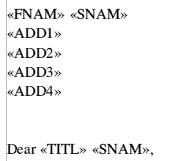
- Place the caret in the top left corner of the letter then move down 10 lines. From the Misc=>Merge submenu choose FNAM. Type a space and choose SNAM from the same menu.
- Use this method to enter the merge tags for ADD1, ADD2, ADD3 and ADD4, each on its own line. This is most easily done by using ADJUST on the menu so that it stays open and using the down arrow to move the caret in the text.
- In the salutation, immediately before the comma, enter TITL, space, SNAM and save the letter. This part of the letter should now look like Fig.2:
Misc=>Print=> takes you to the Print window. Select the Merge and Preview buttons. If you don't select the latter EasiWriter will print the letters without ever displaying the merged data in the document window. Click Print and the first record is merged. A window pops up giving you the opportunity to print the letter but you can click Skip to make it go straight to the next one. Abandon does what you might expect and the merge tags reappear.
Using Impression and Ovation Pro
The following method works with with Ovation Pro and all versions of Impression back to Impression II and even Impression Junior. The Impulse II module, which is incorporated in Powerbase, allows the database and document processor to communicate with each other and pass data back and forth by in-memory transfer; no CSV file or user-intervention needed.
1. Before you can use Impulse merging with Ovation Pro you must install the !Impulse applet. Recent versions of Ovation Pro are supplied on CD ROM and the required applet will be found in the directory DavidPilling.Applets. Open the Applets directory inside the Ovation Pro application and copy the !Impulse applet into it.
2. The filer needs to have "seen" the !TransDDF filter which will be found in the DavidPilling.Filters directory on the Ovation Pro CD. A line in the !Boot and !Run files of !TransDDF needs to be un-commented as described in the !Help file supplied with the filter. I've also added a line to the !Boot file of my copy of Ovation Pro to Filer_Boot the !TransDDF filter.
No preliminaries are necessary if you are using Impression.
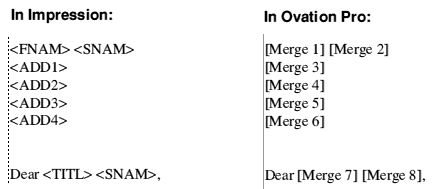
We want the name and address of the addressee on the left, just above the salutation, so place the caret in the text and move it down 10 lines. Now, with Shift held down, point at the First name field in the database and press and hold SELECT. A "text file" icon will appear under the pointer. Drag and drop this on the letter (you don't need to be careful where the pointer is when you release SELECT; the insertion will go where you previously set the caret). What you actually see in the text at this point is a merge tag whose appearance depends on which DTP program you're using. Ovation Pro will simply show [Merge1]. Impression II and Junior are even less informative, showing all merge tags as <Merge>. Impression Publisher and Style are more helpful and display the actual tag of the Powerbase field; <FNAM> in this instance.
Place the caret immediately after the merge tag (on the same line) and type a space. Drag the Surname field onto the letter just as you did with the first name. Don't forget to do this with Shift held down or you'll transfer the actual contents of the field to the letter instead of producing a merge tag. On successive lines beneath the First name/Surname pair drag and drop the four address fields.
Now place the caret in the salutation, immediately before the comma and Shift/drag in the Title field, followed by a space and, lastly, the Surname again. The relevant part of the letter should now look as in Fig.3:
Don't forget to save the modified letter!
From the filer window where you saved the letter drag it onto the Powerbase record window. The Merge window appears:
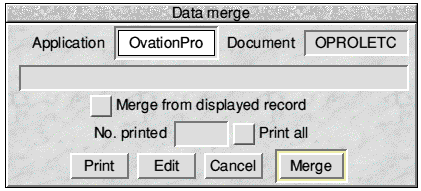
Click on the Merge button and the data from the first record will be transferred to the letter. You will see the merge tags replaced by the actual data:
Click the "next record" button on the tool-pane and the second record will be merged in place of the first. The browse buttons for moving from record to record and to the start and end of the database work as you might expect. So does the search for an individual record. What about printing? To print a single letter with the currently-merged data simply click the Print button on the Merge window. It is more likely that you want to print a letter for each record and it would be tedious to step through the database record by record, clicking Print each time. To make the process automatic you need to select the Print all button but this must be done before initiating the merging process. If you want to try this either be prepared to waste 10 sheets of paper or set !Printers to print to a file, then proceed as follows:
- Click Cancel. The Merge window closes and the data in the letter vanishes, to be replaced by the merge tags once more.
- Close the letter document
- Drag the letter onto the record window as you did earlier. The Merge window re-opens.
- Select Print all then click on Merge.
You might, of course, not wish to print a letter for every record, (just as you don't usually want a report to contain all records). To restrict the merge operation to records with definable characteristics (all those in the same town, for instance) click the Filter button on the tool-pane and enter a search formula to target the records you wish to merge. Starting a merge with Print all selected will then produce letters only for those whose records match the search formula.
You're probably wondering about the Edit button on the Merge window. You can't normally edit the document with merged data in it, in fact Impression makes this very obvious by changing the mouse pointer to a large blue and red cross. If you click on the Edit button the Merge window closes and you are left with the document and its merged data in editable form, just as though you had typed the letter in the usual way. If you decide to save such a letter be sure to save under a new name or you will overwrite the document prepared with the merge tags.
The Impulse method is not only slicker than the CSV file method: it can do things not possible with the latter. Data merging normally generates one copy of the document for each record merged. That's what we want when printing form letters but there are times when we want something more. Remember the !Marks database which we used in Article 3? It's on this disc and can be retrieved with the foregoing link. In the zip file List you will find prepared Impression and Ovation Pro documents to use with !List. (There's an Impression Junior document too but I couldn't get it to work with Junior. I kept getting "Internal error code [01]".) Run the database and drop the appropriate document onto it. (If Impression or Ovation Pro isn't already loaded it will be loaded for you provided the filer knows where it is.) Click Merge and you will produce a neat list of names and marks using Trinity and Homerton fonts in different sizes and styles.
How did we persuade a whole series of records to merge into one page before the page is printed? The answer lies in the extra merge tag which comes after the Science mark on all lines except the final one. In Ovation Pro this simply says [Merge 5], [Merge 10] etc. but in Impression it shows as <NextMatch>. The Impulse command associated with this tag forces the next matching record to be merged without printing the present page and starting a new one. Only at the end, where NextMatch is omitted, does printing occur.
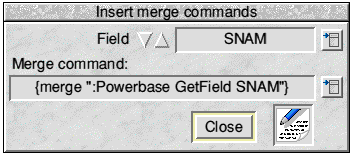
But how do we get that special merge tag into the document? Merge tags to merge database fields were inserted by simply Shift-dragging the fields but that obviously isn't applicable here. From the Powerbase iconbar menu choose Utilities=>Merge commands (second from last entry on Utilities submenu). The Merge commands window (Fig.6) appears:
You can see from these examples that Powerbase and a DTP program can combine to produce far more powerful reporting facilities than Powerbase alone offers.
Using Powerbase's script language
Suppose you're the secretary of a small club or society. You keep membership records in Powerbase and sometimes need to produce a printed list of names and addresses. But you don't do this more than two or three times a year — and every time you need to do it you forget exactly which fields to print and in what order, what options you use for the print format, whether you include last year's members who've not yet paid this year's subs etc. etc. We've all been in this sort of situation; needing to do a repeated but infrequent job and not remembering from one occasion to the next precisely how you do it. The answer? Script it! Since we've just been using the !Mail database we might as well use it for our first foray into Powerbase's script language.
Load up your favourite editor, start a blank text file and enter the following exactly as shown:
                         !SCRIPT
                         !SELECTION TITL,FNAM,SNAM
                         !QUERY ALL
                         !SCRIPT END
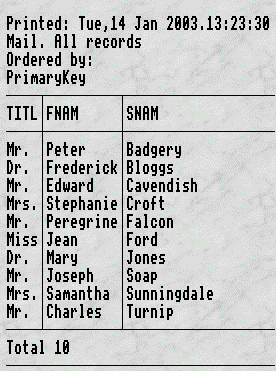
Save the file as Script1. Now open !Mail and drop Script1 onto the record window. The message "Execute script file 'Script1'?" appears. Click OK/Continue and you should produce the following report:
There are no fewer than 67 commands in the script language, enabling you to perform with a script file most of the actions which you can perform with buttons and menus. All commands are uppercase and begin with a "!". A script file is a plain text file containing one command per line (blank lines are ignored) and must begin with !SCRIPT to distinguish it from other text files which might be dropped onto the record window. The final !SCRIPT END makes everything look tidy but is, in fact, optional. Now try making the following modifications to the example above:
1. Change the first line to !SCRIPT QUIET and re-save. When this file is dropped on the record window it executes immediately without asking for confirmation.
2. Instead of specifying the fields to be printed as a comma-separated list of tags you can save the selection and have the script file invoke it using the name of the selection file. Select the three relevant fields (they might still be selected from the previous experiment), go to Save selection from the Print submenu and save the file using the default name offered. Change the second line of the script to !SELECTION Selection. (Only commands need be in uppercase; parameters to commands can be but don't have to be.) The modified script should produce exactly the same output as before.
Selection is the default leafname of a print selection file but you can call the file whatever you like provided you use the same name in the script. If the selection file is saved (as in this case) in the database's PrintRes directory you need only give the leafname in the !SELECTION command and Powerbase will look for the file in that directory. If you want to use a script file stored somewhere else you should specify the full pathname, but occasions for doing this are probably rare.
3. You will have noticed that the fields remain selected after the script has executed. Insert the line !SELECTION, with no parameter at all, just before the !SCRIPT END line. Powerbase will now clear the selection before the script terminates. In fact, since the screen doesn't get refreshed between selecting and deselecting the fields you never see them selected at all
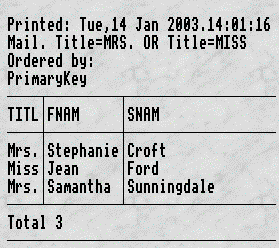
4. Let's now modify the script to print only the women in the database. Before the !QUERY line insert !CASE OFF. Replace the !QUERY ALL line with !QUERY TITL=Mrs. OR TITL=Miss. The report should now look like Fig.8 and we tender our apologies to women readers who are styled "Dr." since our database contains no explicit gender field and the report therefore omits Dr.Mary Jones. (It's only a demo, remember!)
Why did we insert !CASE OFF? You can get the idea by looking at the header of the report. Mrs. and Miss have been forced to uppercase so we had to make the query non-case-sensitive in order to match the entries in the database. This is an aspect of Powerbase which I ought to take another look at. Forcing parameters to uppercase was originally done so that the user didn't have to bother about case when typing them, but there's clearly a downside to it.
5. Just as we saved the selection as a file, we can save the query too. Moreover, this gives us a way round the uppercase problem just described. Assuming you haven't performed a query since the previous one, place the caret in the record window and type Ctrl O to open the Match window with the Old query entered. Change MISS to Miss and MRS. to Mrs. then save the query via Save query from the Print submenu. Similar considerations apply here as with the selection file. The default leafname is Query and the rest of the pathname points to PrintRes. Replace the !QUERY line in the script with !QUERY Query, delete the !CASE line and you should reproduce the output of Fig.8
It's now time to try something slightly more ambitious. Make a field selction by hand exactly as follows.
- Hold down Shift and click Title with ADJUST.
- Keeping Shift held down click First name with ADJUST.
- Release Shift and click Surname with ADJUST.
- Complete the selection by clicking ADJUST on each of the address fields in turn.
- Save the selection in PrintRes as Addresses
Click Save choices and save in the database using the default pathname, which saves the file as PrintOpts in the PrintRes directory.
Now for a new script file:
                          !SCRIPT QUIET
                          !SELECTION Addresses
                          !PRINTOPTS PrintOpts
                          !QUERY Query
                          !PRINTOPTS
                          !SELECTION
                          !SCRIPT END
The new command here is !PRINTOPTS, which is used to load our previously-saved print options file. Note that this, like loading the field-selection, must come before the !QUERY command. The two commands after !QUERY simply tidy up by restoring the default print options and clearing the selection. Each printed record from the report appears like this:

How did we get three fields to appear on the first line? That was the purpose of holding down Shift whilst selecting Title and First name. When using Vertical format (so-called because it normally prints fields vertically beneath each other) you can prevent a newline after a field by selecting it with Shift-ADJUST. This is called field concatenation. Shift was released before selecting the Surname so that normal behaviour was restored before printing the address. The Spacer which separates the concatenated fields was set to be 1 space.
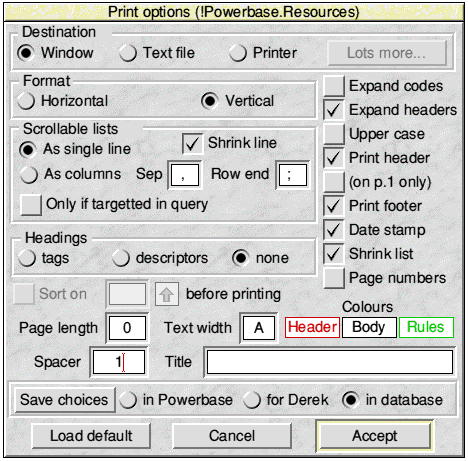
The format just demonstrated looks rather like a mailing label and we will end this article by devising a script to print labels for the 10 members of the !Mail database. The Addresses selection file will be used again for this example and the query is simply !QUERY ALL. The important thing to get right is the print options file which needs much more setting up than in the previous case. Open the Print options window and start by clicking Load default.
- Select Printer as the Destination and click Lots more. This gives access to the Printer setup window.
- The Print as section near the bottom left gives two options which are only meaningful for printing on paper. Select Labels. The label information on the right of the window becomes "live" (and Horizontal and Vertical formats on the Print options window are both deselected).
- We'll assume the defaults are to be used, i.e. "three-up" labels with horizontal and vertical repeats of 64 and 34mm respectively. Leave everything else as it is and click Close.
- From the Print options window save the file in PrintRes as LabelOpts
                          !SCRIPT QUIET
                          !SELECTION Addresses
                          !PRINTOPTS LabelOpts
                          !QUERY ALL
                          !PRINTOPTS
                          !SELECTION
                          !SCRIPT END
Load !Printers, switch on your printer and make sure there's paper loaded. I wouldn't use real (expensive) label stationery for this; you can see the result perfectly well on plain paper. Drop the script onto the record window and Bob's yer uncle - out comes a neat page of "labels"!
There's just one last refinement we might include. When you come to print a set of labels you always find that there's a partly-used sheet. You might have noticed, on the Printer setup window, that there's an icon labelled Start at label where you can enter the number of the first label to be printed. So, if you have a sheet of "three-up" labels of which all the first row and one from the second row have been used, you could enter 5 in this box and the first name and address in the database would be printed on label 5. Once the first sheet has been printed, printing reverts to starting on the first label.
Now this is very useful when you're doing eveything manually, but not much help when the process is automated with a script because the starting label will be different every time you come to use the script. Is there a way round this? Yes! Place the following line in the script before the !QUERY command but after the !PRINTOPTS command:
It must be exactly as shown, with a space, five commas and a colon after !LABEL and a concluding question mark. When you drop this script on the record window the first thing you see is Fig.11:

Enter a number greater than 1 and click OK (or type Return). Printing proceeds as before except that the first record appears on the label whose number you entered.
So what's happening here? Although we usually save a whole package of print options and printer setup options as a file and load them with the !PRINTOPS command, there are other script commands to set the options individually. One such command is !LABEL which takes up to nine parameters, separated by commas. The sixth parameter is the number of the start label on the first sheet and to specify label 5 explicitly we could use !LABEL ,,,,,5. The commas are necessary to show that parameters 1-5 are not being specified. Any such command coming after an options file has been loaded using !PRINTOPTS will override whatever value the options file set. Instead of supplying the actual parameter, however, we have supplied a prompt string. To be recognized as such a prompt string must end with a question mark and a colon is used to show where the string begins. When Powerbase identifies a prompt string in a script command it displays the window shown in Fig.11 and expects input from the user. Whatever the user enters replaces the prompt string and becomes the actual parameter. Any script command which takes a parameter can request user input in this way - a very powerful feature.
Next time
There is much more which could be said on the subject of scripting and the next article will continue with this. Also discussed will be ways of making Powerbase look and act as you want it to.